
Installing PHP itself is quite straightforward; the difficulty lies in configuring IIS to use it! There are a number of programs contained within the standard Win 32 distribution, for example it contains two versions of the PHP interpreter that we can use with IIS. The first is a DLL (Dynamic Link Library) that contains an ISAPI module for IIS. This module will run as a persistent interpreter in IIS, one that does not need to be called externally, so in theory should provide the best performance.
In reality, I have found the ISAPI module to be unstable with PHP 5 and IIS on Windows, often causing access violations. These issues will most likely be resolved in time, and may be by the time that you are reading this.
The second version, a standard C executable, is the one that we will be using. This runs under IIS as an external CGI (Common Gateway Interface) call, similar to the way Perl/CGI works, so as a result is not as quick as the ISAPI module, but it is very stable. In the trade-off between speed and stability, we should always favour stability for a live production server.
Installing Steps
-Create a folder called PHP on the C drive root
-Unzip the contents of the zip file you downloaded for PHP 5 into C:\PHP
-In C:\PHP, rename php.ini-dist to php.ini
-You may want to add C:\PHP onto the system path variable, as you did for MySQL in the previous section
That’s it! Now onto configuring PHP 5.
Working with the php.ini File
The C:\PHP\php.ini for is the main configuration file for PHP on our server, so we will be spending quite a bit of time working with this file. Open it up now with a text editor, you will find it to be very well commented and easy to work with. This is a good example of the difference between open source software and commercial software, for example IIS uses a difficult-to-navigate tab-based GUI (Graphical User Interface) to configure the server, while Apache uses a text file similar to the one that PHP uses called httpd.conf. Personally, I like this simple no-nonsense approach.
Enabling E-mail Support
If you have access to a mail sever, for example an Exchange server, then you can instruct PHP to use this server to send mails from its mail() function. Modify the following lines in your php.ini file to pint to the network address of your mail server, where available:
[mail function]
; For Win32 only.
SMTP = mailserver.mydomain.com
smtp_port = 25
PHP will now route e-mails from the mail() function to this sever.
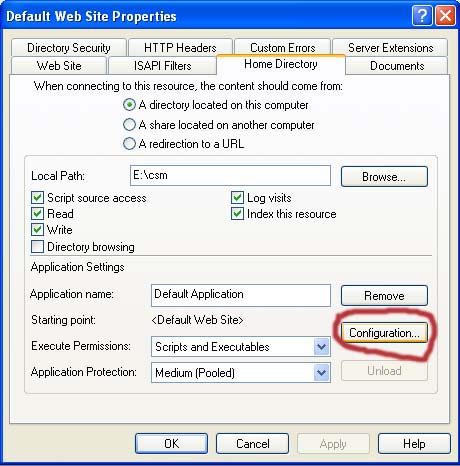
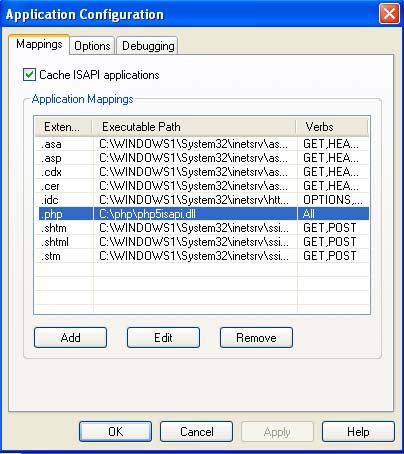
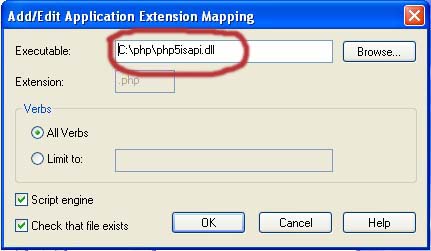
Configuring IIS to use PHP
Now we need to get IIS using PHP 5 to interpret files with the .php file extension. As stated previously, we will be using the CGI executable version of PHP 5 with IIS for stability reasons.
Open up C:\PHP\php.ini in a text editor, and replace the line
; cgi.force_redirect = 1
with:
cgi.force_redirect = 0
As stated in the comment in the php.ini file, you MUST turn this off to get PHP to work as a CGI in IIS.
Save your modified php.ini file. Now in C:\Inetpub\wwwroot\ create the following PHP script:
<?php
phpinfo();
?>
And save it as info.php
Enabling MySQL Support
There are two separate APIs (Application Programmers Interface) available for MySQL with PHP 5.x. The standard MySQL API is the one that came with PHP 4.x, while the new MySQL Improved API (or mysqli) contains all the new PHP functions for accessing the new features of MySQL 4.1 and above, such as stored procedures that will be introduced in MySQL 5.
To summarise, to support legacy PHP applications, we should install the mysql API, while to support future PHP applications, we should install the new mysqli API. The best solution is to install both.
- In the php.ini file, replace the line:
extension_dir = "./"
with
extension_dir = "./ext" (Follow your extension)
Or to reflect where your extension DLL files are for PHP 5, they are usually in C:\PHP\ext (hence the relative path “./ext” should work fine). - Copy the libmysql.dll to C:\WINDOWS\system32.
- In the php.ini file replace:
; extension = php_mysql.dll
with
extension = php_mysql.dll
Or if it is not already there, then add it in the same section as the other extension files listed - Now add:
extension = php_mysqli.dll
To the extension section of the php.ini file, to enable the mysqli extension.
Reload the PHP info page, and scroll down until you find a section on mysql and another on mysqli - Enable Session.
session.save_path = "./tmp"
replace to
session.save_path = "C:/php/session"
To Enable Curl you need 2 dll file they are libeay32.dll AND ssleay32.dll
- Copy 2 .dll file to C:WINDOWS.
- In the php.ini file replace:
; extension=php_curl.dll
with
extension=php_curl.dll
- After that run phpinfo you will see the curl inside
After that copy PHP.ini file to C:\WINDOWS
MUST Restart the PC.
All done